Hands-on Files
The DeapSECURE hands-on exercises can be run on many platforms. They were initially created and tested for ODU Wahab cluster, but can also be run on a sufficiently powerful local computer with a standalone Python distribution such as Anaconda. Please find below the instructions for the HPC platform you will be using. Your instructor or mentor should have informed you concerning which platform you should be using.
Downloading Hands-on Materials
If you are taking this training using ODU’s Wahab cluster, please read through the instructions on launching a Jupyter session via Open OnDemand and copying the hands-on files in order to set up your own copy of the files in your own home directory on the cluster.
The downloadable resources below are made available here for the general public to use on their own computers (laptop/desktop or HPC cluster). These were taken from the online workshop series in the Summer of 2021 (a.k.a. “WS-2020-2021”).
Older versions of the hands-on materials can be found in Hands-on Materials in the Extras section of this site.
To download the notebooks and the hands-on files, please right-click on the links below and select “Save Link As…” or a similar menu.
Resources: Jupyter Notebooks
- Session 1: Fundamentals of Pandas - (html)
- Session 2: Analytics of Sherlock Data with Pandas - (html)
- Session 3: Data Wrangling and Visualization - (html)
(The HTML files were provided for convenient web viewing.)
Resources: Hands-on Package
- Sherlock hands-on files, except the large files (table of contents) – This also contains the Jupyter notebooks above
- Sherlock large data file: “sherlock_mystery_2apps.csv” (table of contents)
- Spam-ip based hands-on (legacy, optional) (table of contents)
The hands-on files are packed in ZIP format. The first two ZIP files above are mandatory. To reconstitute: Unzip all the files, preserving the paths, into the same destination directory.
Recommended Directory Layout
This lesson assumes the following conventions, which is applicable whether the training activities take place in an HPC environment or on personal machines (e.g. laptops or desktop computers).
-
Hands-on files are expected to be placed in the
~/CItraining/modules-bddirectory, where~refers to the user’s home directory. -
The Zip archives above should be extracted into
~/CItraining, because the paths inside the Zip archives have includedmodule-bdalready.
We recommend that learners and instructors adopt the same directory layout so they can follow the literal paths that may appear throughout the lesson episodes.
Preparing Hands-on Files on ODU Wahab Cluster
To prepare for the exercises on Wahab, please run the following commands on the shell. (This can be done using a terminal session under SSH, or a terminal session within Jupyter.)
The Quick Way
A convenience script has been prepared to quickly populate learner’s directory with the hands-on files. Simply invoke the following command in Wahab’s terminal:
$ /shared/DeapSECURE/install-modules
This will copy all the DeapSECURE hands-on modules (currently six of them)
into CItraining directory under user’s home directory.
Under the hood, the install-modules script uses rsync to copy or update
hands-on files in the learner’s directories (older files will be renamed with the ~
prefix as usual, e.g. file.txt –> file.txt~).
Under normal condition, running this script again should not overwrite files
that have been modified by the learners.
However, if the instructor publishes an update to one or more of the hands-on files,
then running this command will allow newer files to be pushed into learner’s
directory.
Copying or Updating Select Module(s)
If you only want to copy or update one module (say, only Big Data), then invoke the script in this way:
$ /shared/DeapSECURE/install-modules -m module-bdTwo or more modules can be specified by specifying a whitespace-separated list (which must be quoted) after the
-mflag. For example,$ /shared/DeapSECURE/install-modules -m "module-bd module-hpc"These are the available modules:
module-hpcmodule-bdmodule-mlmodule-nnmodule-cryptmodule-par
The Manual Way
Hands-on files are located on Wahab on this subdirectory:
/shared/DeapSECURE/module-bd/
(For Turing, the location is /scratch-lustre/DeapSECURE/module-bd/Exercises).
Create a directory ~/CItraining/module-bd:
$ mkdir -p ~/CItraining/module-bd
Copy the entire directory tree to your ~/CItraining/module-bd:
$ cp -pr /shared/DeapSECURE/module-bd/. ~/CItraining/module-bd/
Be careful! All characters do matter (even a period must not be missed). Do NOT insert whitespace where there is not one in the command above!
Now change directory to ~/CItraining/module-bd,
$ cd ~/CItraining/module-bd
and you are ready to learn! If you are using the Jupyter notebooks (see the resources near the top of this page), navigate your Jupyter’s file browser to this directory and select the appropriate notebook to open.
About Jupyter Notebook
Jupyter Notebook is an open source software which provides an interactive web-based platform for code development and execution. Does the UNIX terminal put you off? If yes, Jupyter Notebook will be of great comfort. With Jupyter, Python code and UNIX shell commands can be executed interactively from within a single notebook document. Output from these commands will be saved on the same notebook alongside the commands, resulting in a nice record of a computational work. For this reason, many scientists and analysts have chosen Jupyter Notebook to make their research work reproducible by others. Here is an example of a Jupyter session:

In the world of Jupyter, the word “notebook” refers to two things that are closely related: Jupyter Notebook (in title case) refers to the software which provides the rich, web-based capability to interface with an interactive Python session; the other is the notebook (lowercase) document and file format which embodies the work done using the Jupyter Notebook software.
As shown in the figure below, Jupyter Notebook actually
consists of several interconnected components:
the (Python) kernel, the Notebook server, and
the web interface that the user runs in his/her own web browser.
The Notebook server is the front-end component that loads and saves
the code+output combination in a notebook document format.
A notebook document is actually a JavaScript Object Notation (JSON) file
that has the .ipynb extension in its filename.
The web interface running on the user’s browser provides the “window”
by which the user can interact with the Notebook server.
The kernel in the backend runs the actual Python interpreter that accepts
user inputs (received from the web interface) and
passes the resulting outputs to the Notebook server to be displayed
on the user’s web interface.
Jupyter supports more than just Python kernel:
in fact, there are tons of kernels available for many languages to run on a Jupyter Notebook!
Further information about Jupyter Notebook can be obtained from the official
documentation.
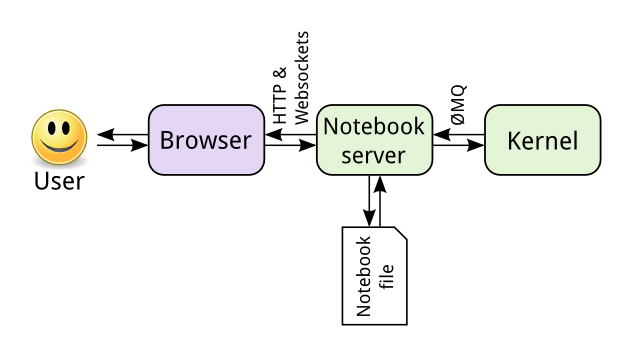
Figure: Components of Jupyter Notebook program. (Source: Jupyter Notebook documentation)
Jupyter Notebook can be installed on a personal computer, in which case both the Notebook server and the kernel run in the background on the same computer. Users who want to run Jupyter Notebook on their own computers are recommended to install Anaconda distribution suite that consists of Python interpreter, popular libraries and tools, including the Jupyter Notebook.
For the subsequent training modules where we are primarily using Python programming language, you are encouraged to use Jupyter Notebook. In this lesson module, we will create and access an individual Jupyter Notebook server on an HPC cluster. Using an appropriate networking setup, we will be able to interact with this Notebook from the web browser on our own laptop, while harnessing the power of a supercomputer to process big data and/or mssive computation. The setup instruction below pertains specifically to running Jupyter Notebook on ODU Turing cluster (in general, a cluster running SLURM batch scheduler). In this approach, both the Notebook server and the kernel run on an allocated compute node, and SSH tunneling is used to provide secure access from user’s browser to the Notebook server.
Setting Up Jupyter Notebook on HPC Cluster
Using Open OnDemand on ODU Wahab Cluster
On ODU’s Wahab cluster, we have set up Open OnDemand, an easy-to-use web-based access method to its HPC capabilities. Going forward, this is the recommended way to perform the hands-on activities in this module. Please refer to ODU’s documentation page for instructions on how to launch Jupyter on the Wahab cluster. Important: Please select the Legacy Python suite to run the hands-on activities in this module.
Instructions for ODU Turing & Wahab Cluster via SSH (Older)
The following instruction will aid launching jupyter on Turing or Wahab to support our workshop.
At the heart is a bash script called launch_jupyter_turing or launch_jupyter_wahab
that initiates the Jupyter notebook server on a Turing’s or Wahab’s compute node
then creates an appropriate SSH tunnel to provide access.
Module environment
(Only needed if you will use Jupyter on Turing.)
Edit your ~/.tcshrc_turing file and add the following lines at the end of the file:
enable_lmod
module use /scratch-lustre/DeapSECURE/lmod
module load DeapSECURE
(All users)
To provide the module command within the Jupyter environment,
create the following directory:
$ mkdir -m 0700 ~/.ipython/profile_default/startup
then create a text file named ~/.ipython/profile_default/startup/000-odurc-lmod.py
with the following contents:
import sys
import os

try:
    from lmod_python import module
except ModuleNotFoundError:
    sys.path.append('/shared/apps/common/lmod/scripts/init')
    from lmod_python import module

vdir = os.getenv('VIRTUAL_ENV')

if vdir:
    sys.path.insert(0, '{}/lib/python{}.{}/site-packages'.format(vdir, sys.version_info.major, sys.version_info.minor))
Step 1 (Windows Users Only)
We need a basic UNIX-like environment to run the Jupyter launch script.
Windows users needs additional software to provide this functionality.
We recommend Windows users to install
MobaXterm,
which consists of an SSH client, a UNIX-like local environment,
and other numerous features.
The Home edition is sufficient for most people.
With the newer versions of MobaXterm (versions 12 and higher),
you will also need to download
CygUtils.plugin and place it where the MobaXterm executable resides
(usually C:\Program Files (x86)\MobaXterm Home Edition\ (FIXME)).
CygUtils.plugin provides a local UNIX shell environment.
This UNIX environment will be used briefly to run a script which
sets up Jupyter Notebook server on Turing and makes it accessible from your computer.
(Alternatively, download the portable version of MobaXterm,
which already includes CygUtils.plugin.
Unpack all the files in the zip file to a location you can remember.)
-
Upon launching MobaXterm, you should see a window that looks like this:
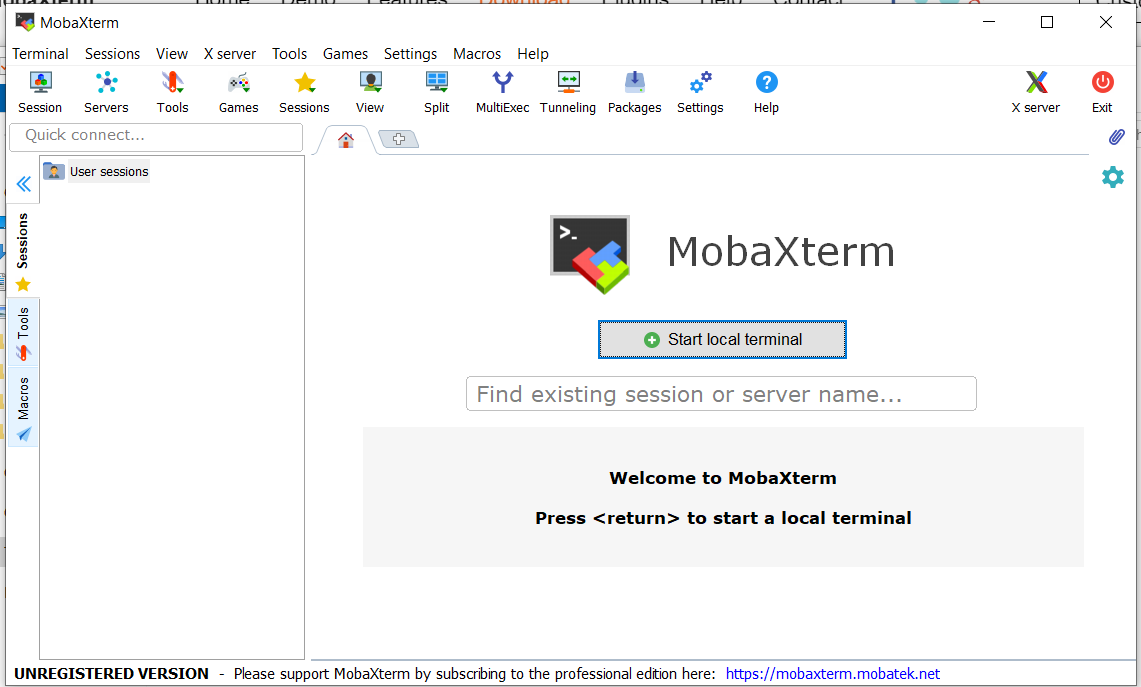
If you do not see the “Start local terminal” button or it cannot be clicked, most likely you do not have
CygUtils.pluginalongside the MobaXterm executable program. -
Click on “Start local terminal”. Congratulations, you have a UNIX terminal running on yours Windows PC.
Step 2 (All Users)
Do these steps on your own computer—not on Turing or Wahab or other cluster! You only need to do this step once.
-
Open a new terminal (if one is not already open)
-
(For Wahab) Run the following command to download a script that will launch Jupyter Notebooks on Wahab cluster. By default, this command downloads and saves the file as
launch_jupyter_wahab.$ curl https://deapsecure.gitlab.io/deapsecure-lesson02-bd/files/launch_jupyter_wahab > ~/Desktop/launch_jupyter_wahab -
(For Turing) Turing is an older cluster at ODU. We also have a similar script that will launch Jupyter Notebooks on Turing cluster. Use a similar instruction as above, replacing “wahab” with “turing”.
Linux and Mac Users (Optional)
You have an option to save the launch script on a different location accessible via the
PATHenvironment variable. We can use the~/bindirectory to store the script and set its executable bit:$ mkdir ~/bin $ mv ~/Desktop/launch_jupyter_wahab ~/bin $ chmod a+x ~/bin/launch_jupyter_wahabFor
bashshell users, add the following line at the end of your~/.bashrcfile:export PATH="$PATH:$HOME/bin"Most Linux and Mac are using
bashshell, unless you know exactly what shell you are currently using. Exception: the users of newer Mac OS (Catalina and higher) havezshas their default shell. For these users, add theexportstatement above to~/.zshenvfile instead.(end optional steps)
Step 3: Launching Jupyter Notebook on Wahab (All Users)
Do these steps on your own computer—not on Wahab or other cluster!
Now we are ready to launch and connect to Jupyter on Wahab.
Launch the script we downloaded in Step 2 above using bash.
$ bash ~/Desktop/launch_jupyter_wahab --user XXXX --local-port YYYY -t 1-0
Important:
Replace XXXX with your own MIDAS ID (something like xjohn099—not
xjohn099@odu.edu),
and YYYY with a port number greater than 1023.
Wait until a message displays such as below:
OK: Jupyter server launched successfully
Setting up pipeline to connect to the Jupyter server...
Pseudo-terminal will not be allocated because stdin is not a terminal.
xjohn099@turing.hpc.odu.edu's password:
Now please launch your browser to connect to Jupyter:

    http://localhost:8780/?token=0295648a1647dc8eeda92746732918d4410046b61db84412

Do not kill this SSH process as it will kill the pipeline!

In case the pipeline dies, you can reconnect using:

    ssh -L 8780:coreV2-22-036:8425  xjohn099@turing.hpc.odu.edu

remove /Users/xjohn099/.jupyter_remote.CeFzjI?
Seeing above message,
- Open your web browser
- Copy the link beginning with
httpprotocol and paste in your browser- The
httplink should bear resemblance to the following link, with the port same as specified earlier.http://localhost:8780/?token=0295648a1647dc8eeda92746732918d4410046b61db84412
- The
Jupyter appears similar to the image below which displays the contents of your current directory.
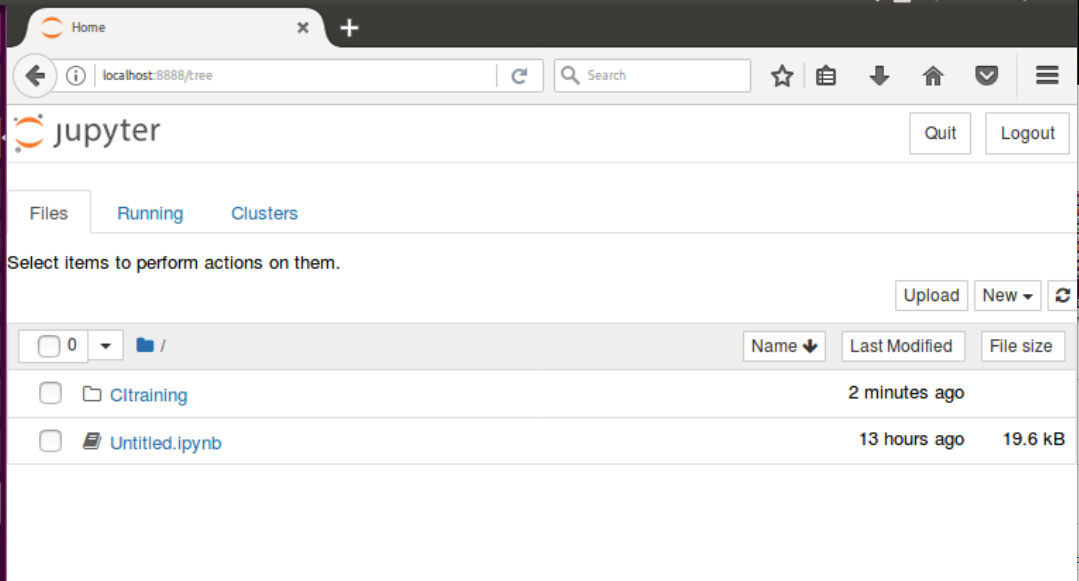
Well done, you have successfully launched Jupyter on Turing and made it accessible on your computer!
Warning
Do not close or interfere with the current state of the open terminal above, or else the connection to the Jupyter notebook will be terminated.
The launch command above will retain the Jupyter session for 1 day.
Setting Up Jupyter on a Personal Computer (Laptop or Desktop)
The core hands-on materials, as it is presented in the (pandas-based) lesson, can be performed using typical computers with at least 8 GB RAM and about 1 GB disk space. Learners interested in working with the entire sample “SherLock” dataset would obviously require significantly more computing resources (both RAM and disk storage)—this is where HPC and appropriate cloud resources come in. Learners can set up a Jupyter computing environment on his/her own personal computer by installing Anaconda Distribution (formerly was called Anaconda Individual Edition or Anaconda Personal Edition). Next, download the workshop hands-on files listed in the Workshop Resources section and you have the learning environment ready.
Using Jupyter
Jupyter has a very user friendly interface which will be discussed in this section.
Classic Jupyter Notebook vs Jupyter Lab
On Wahab, we are deploying the newer interface called Jupyter Lab. Instructions in this section were made for the classic Jupyter Notebook interface. They are applicable to both the classic and Lab interfaces with slight variations. Please refer to their respective documentations to learn more.
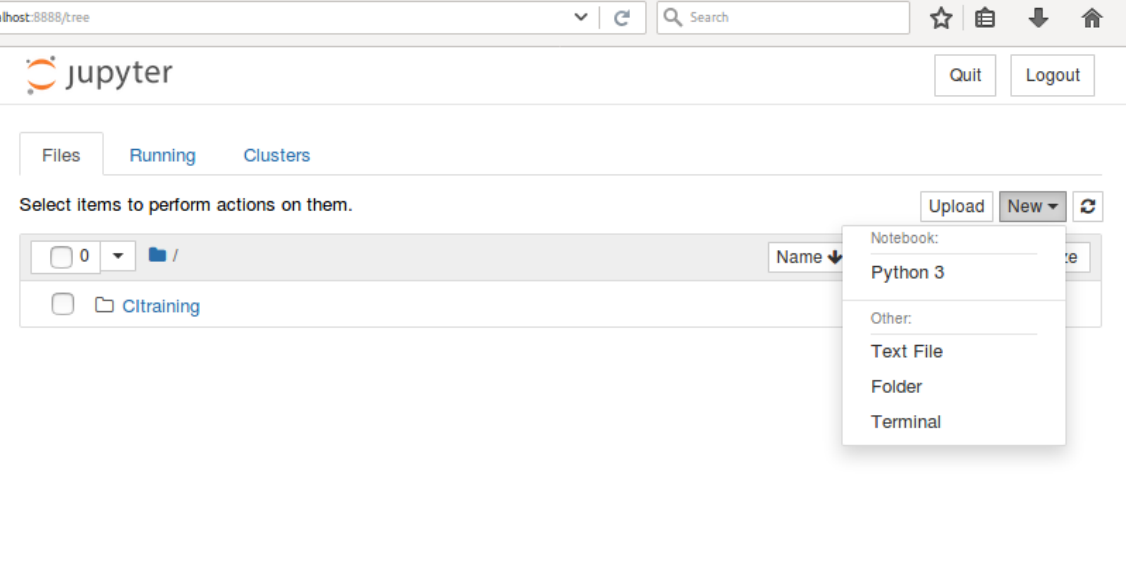
Creating a New Notebook
Click on New in the upper right level as shown in image below.
Selecting Python 3 creates a new session with a blank notebook
(named Untitled.ipynb by default)
in your current working directory.
Working with Notebooks
A Jupyter notebook consists of a sequence of cells, as shown in the following illustration:
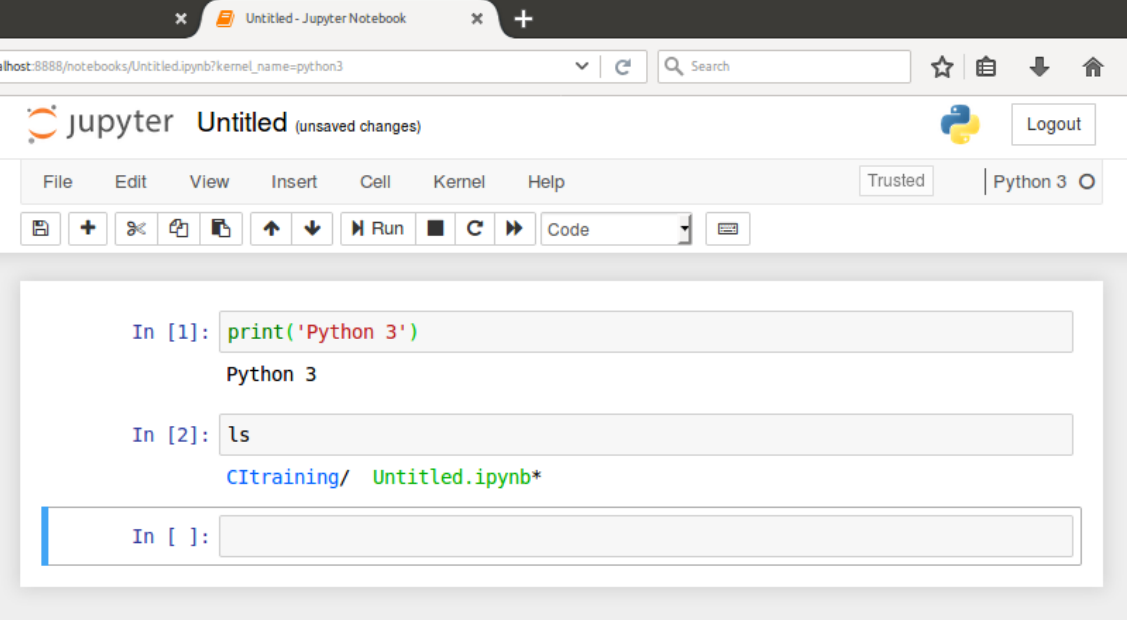
In the first cell, a Python statement prints a text: Python 3.
In the second cell, a shell command named ls was executed, and
the output was displayed right following the command.
The third (and current) cell is currently empty.
Indeed, Jupyter allows Python codes to coexist with shell commands,
making the notebook a convenient one-stop interface for both worlds.
The focused cell is displayed with a green or blue bounding box
green boundary denotes that you are in the Edit mode,
in which you are editing the current cell.
On the contrary, a thick blue left margin with gray
boundary lines indicates the Command mode.
You can toggle between the the Edit and
Command modes with Esc and Enter respectively.
(On Jupyter Lab, the color and indicator may look different;
but on the status bar at the bottom of the screen there is a small text
indicating the mode–Edit or Command).
Edit Mode
While in Edit mode, you can type in your code or command into a cell. pressing Enter creates a new line within the cell. To execute a command, use Shift + Enter.

Command Mode
In this mode, the keyboard maps to a set of shortcuts. Some of the actions may not affect just a single cell, but the entire notebook. For example, you can create cells, copy cells, move cells, or restart the kernel; many other actions are available.

Below are a few shortcuts in the command mode.
-
Basic navigation: Up or k; Down or k
-
Enter edit mode: Enter
-
Execute/compile cell: Shift+Enter
-
Saving the notebook: s
-
Change Cell types: y (to Python code); m (to Markdown); 1…6 (change heading level)
-
Insert new cell: a (after current cell); b (before current cell)
-
Cell editing: x (cut); c (copy); v (paste); d,d (delete current/selected cell(s)); z (undo cell deletion).
To learn more about the keyboard shortcuts available in Edit and Command modes, go to the Help menu, and choose Keyboard Shortcut.
Mouse Navigation
The menubar within the Jupyter interface has icons which execute specific actions. Hover over any icon. Do you observe the tooltip? It explains the specific command of the icon.

Working with Documents, Files, and Terminals
Jupyter also has capabilities to create and/or edit python or other text files, manage files and folders, as well a launch a terminal running a shell.
For further learning on the notebook’s interface, please go to Jupyter documentation website.