Investigating the Origin of Spam Emails
Overview
Teaching: 20 min
Exercises: 15 minQuestions
What is a spam database?
What are the uses of spam database?
How do we trace the origin of an email based on its header information?
How do I run a program interactively on HPC?
Objectives
Explain the method to discover the originating IP address of an email sender.
Explain the utility of Spam Archive to study statistics concerning spam emails.
Explore a spam dataset and learn the information bits that point to the origin of the spam.
Use a simple script to extract the originating IP address of email messages in an automated way.
Motivating Background: Analyzing Email Origin
In this episode, we will present the technical background of our first workload to run on HPC, which is a program to determine the country of origin of an email message. We will delve fairly deep into “how” email transmission works, what information is contained in emails that can be used to reveal its origin. (The approach described here applies to all emails, irrespective whether they are legitimate or spam.) At the end, we will present a simple script that provides an automated way to analyze email origin and run the script on an HPC environment.
Spam emails are a common issue, and tracing their
origins can reveal insights into their sources.
The header of an email contains various fields,
including the well-known ones such as Date, From,
Reply-To, Subject, and To,
which are displayed by common email programs.
It’s important to note that the From: field
can easily be falsified, which is a weakness of
the protocol used to send emails.
There are more information fields stored in the header block
which are not shown by default due to its overwhelming technicality.
These fields may contain tracking information bits that are generally more
reliable for investigative purposes.
How An Email Message Transmission Works
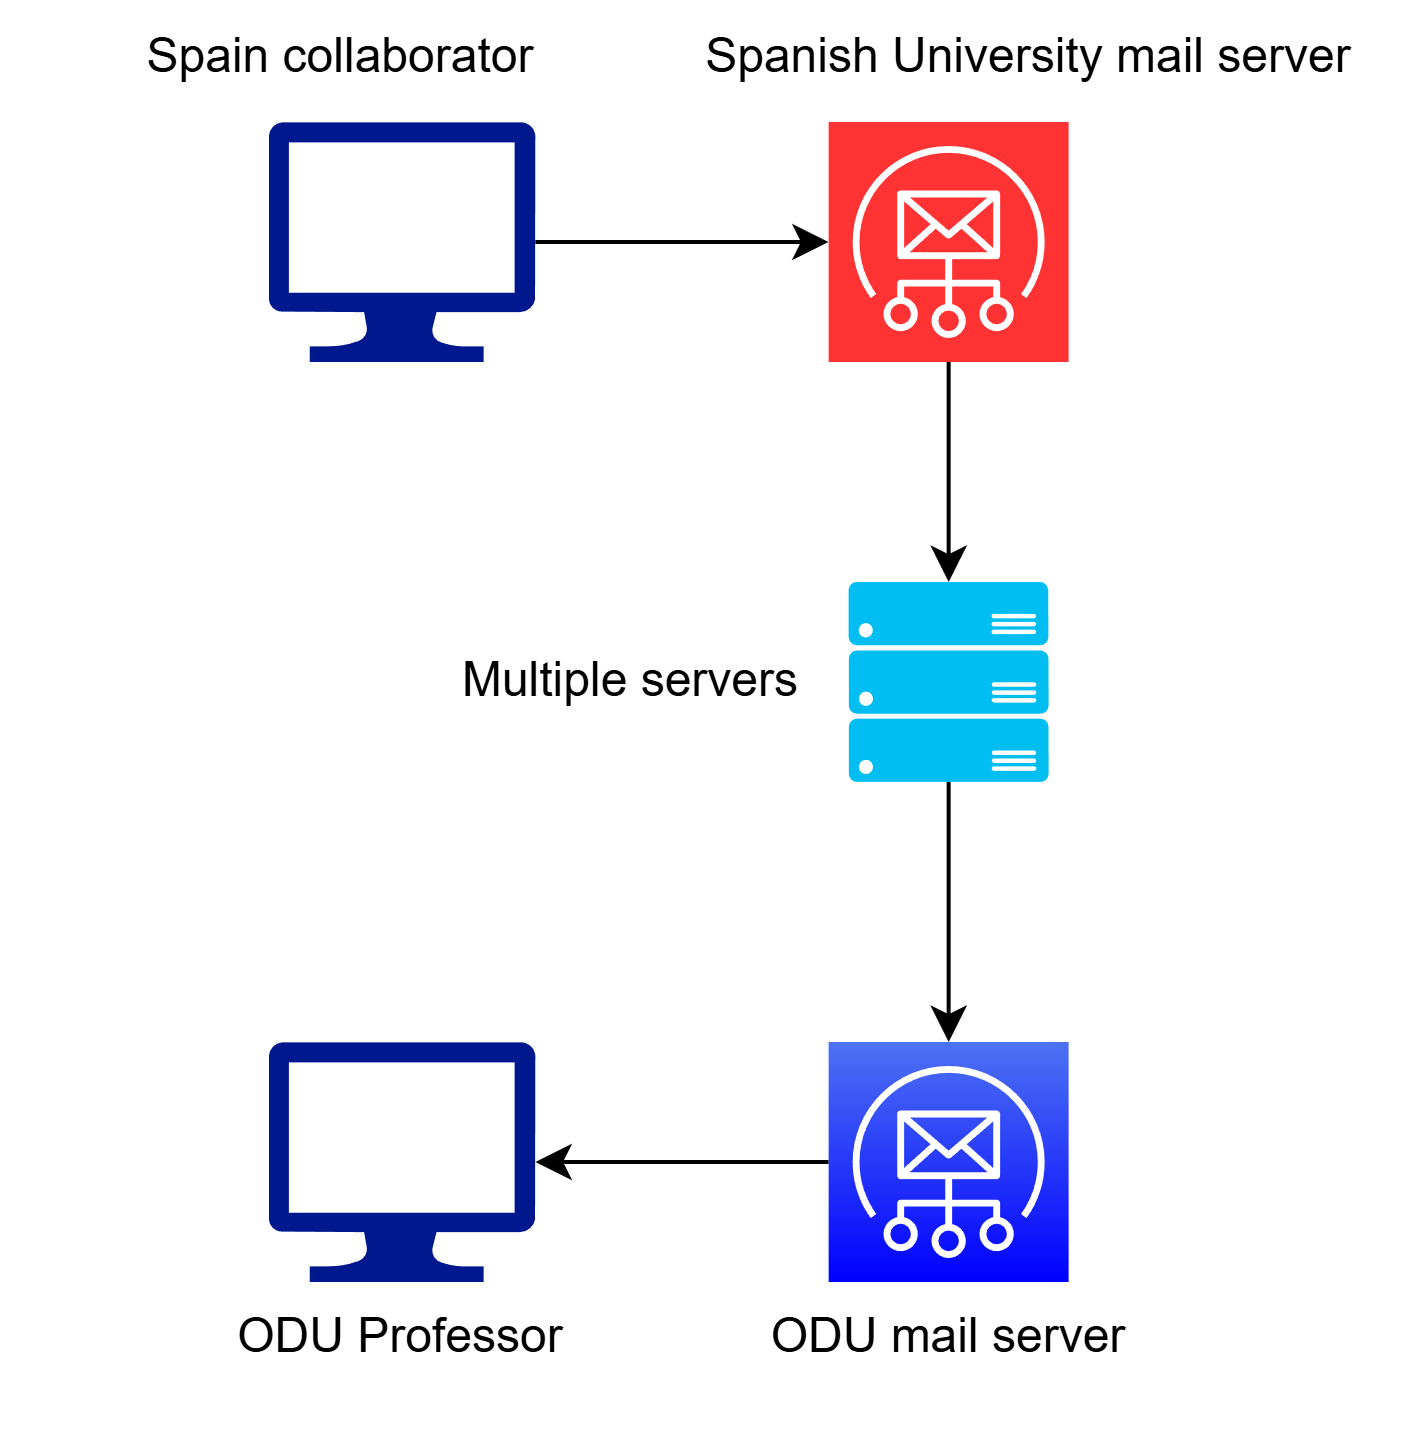
Understanding the origin of an email involves tracing the path of its transmission from sender to recipient. In a nutshell, when an email is sent from the sender’s computer, it travels through various servers until it is finally displayed on the recipient’s computer. Let’s suppose that Roberto El Investigador, a research collaborator in Spain, sent an email to a professor Elena Sherlockina at Old Dominion University (ODU). The email’s journey began when Dr. Investigador sent the email from his computer (or tablet or smart phone, for that matter). It was first received by his university’s mail server, then it was relayed through intermediate servers until it reached ODU’s mail server and was stored at Dr. Sherlockina’s mailbox in this server. The email was then downloaded to Dr. Sherlockina’s computer or phone by her email program, where she could read her collaborator’s message. The following graphic shows the journey taken by the email message written by Dr. Investigador:
In an honest world, a Received: field is prepended to the email’s header
whenever an email is passed from one server to another.
At minimum, two Received: field should exist in the header of an email:
the first one was generated by the sender’s mail server
when it first received the message from the sender’s computer,
and the last one by the recipient’s mail server
when it received the message and stored it at the recipient’s mailbox.
More of such fields could be present, if the message was relayed
through intermediate servers.
The Received fields in the email header are typically
hidden from the users.
Here is an example of a complete email header, including the hidden parts:
Delivered-To: bruce@untroubled.org
Received: (fqmail 15388 invoked from network); 02 Jan 2018 09:06:29 -0000
Received: from mx06.futurequest.net (mx06.futurequest.net [69.5.6.177])
  by 10.170.1.183 ([10.170.1.183])
  with FQDP via TCP; 02 Jan 2018 09:06:29 -0000
Received: (qmail 4668 invoked from network); 2 Jan 2018 09:06:29 -0000
Received: from quebec.terocrif.bid (go1-longer.lgol.net [173.232.229.177])
  by mx06.futurequest.net ([69.5.6.177])
  with ESMTP via TCP; 02 Jan 2018 09:05:18 -0000
DKIM-Signature: v=1; a=rsa-sha1; c=relaxed/relaxed; s=k1; d=terocrif.bid;
 h=Mime-Version:Content-Type:Date:From:Reply-To:Subject:To:Message-ID; i=Numerologist@terocrif.bid;
 bh=f2/wUk81V4CNBaRgz/K4Mi1frMo=;
 b=SrNgEhZ3gAM4U2TipyThZh4O2aJ6VJtQUKqWF/5hDk4DkIoDqZ4phbuoqXYqHf2qrfWcReKxpcsc
   a1uJs7ZOGOPGsOn8vAnRQXRJ1UAtM0QiJ0zrJPT6fyw1wBb+NI78CYDk9Nb/4uACo+q0NZ/ESxI8
   EMwvKW08UA9TqB9rXjk=
DomainKey-Signature: a=rsa-sha1; c=nofws; q=dns; s=k1; d=terocrif.bid;
 b=BbAGr/SMsCdn9nKUPOTde4e4JqiJ1MnAVgJZc+NRbeBZ3ZMllL7fXo53mK+tBW6OtnQYOA6yD32G
   pT+rDZPC2AvFWuCcWyKr8M/nb45inyD/rZFe09QXd/I84VRfwP21srIox48XRsq3PcSgUgdKcCWC
   vJyvNSEA9tPrLdtenMo=;
Mime-Version: 1.0
Content-Type: multipart/alternative; boundary="4c82fb7de83aaebbfb586f12b7c9b955"
Date: Tue, 2 Jan 2018 04:04:02 -0500
From: "I was just shocked!" <Numerologist@terocrif.bid>
Reply-To: "I was just shocked!" <Numerologist@terocrif.bid>
Subject: Science of Numerological Analysis
To: <bruce@untroubled.org>
Message-ID: <0.0.49472.yncgxxc140zpwvzt645835.0@terocrif.bid>
Content-Length: 7066
The header stops when there is a blank line. In the original email,
there is indeed a blank line right after the Content-Length: field.
Can You Retrace Your Own Email Message’s Journey?
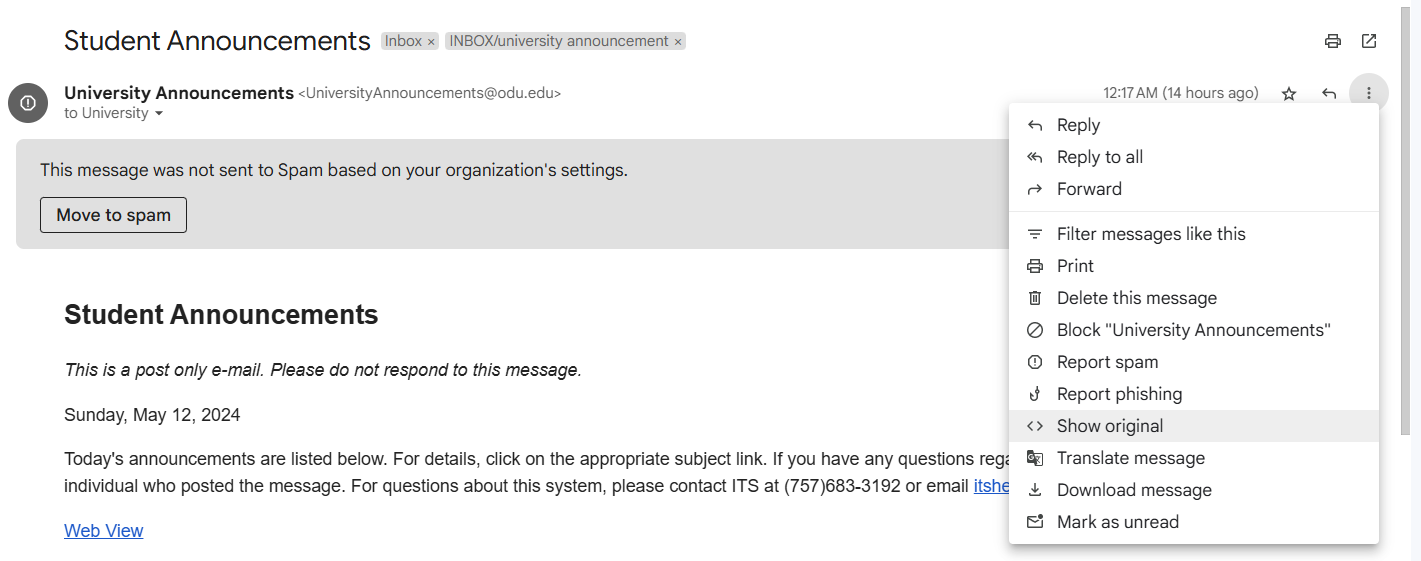
Most common email clients have the ability to show the hidden part of an email’s header for investigative purposes. For example, Gmail (Google’s popular email service) provides a simple way to retrieve the full email header, which includes both the visible and hidden fields. From the message view, click or tap the
...icon on the top right of the message to open a message-specific menu. Choose the “< > Show Original”, as shown below:
Once you complete this episode, you may try this experiment on one of your own message and see if you can obtain the origin of that message.
Pinpointing the Ultimate Origin of an Email
In this lesson, we limit ourselves to the Received: fields that look like this:
Received: from quebec.terocrif.bid (go1-longer.lgol.net [173.232.229.177])
  by mx06.futurequest.net ([69.5.6.177])
  with ESMTP via TCP; 02 Jan 2018 09:05:18 -0000
According to this field, the mail server mx06.futurequest.net noted that
it received this email from a server named quebec.terocrif.bid, whose
IP address is 173.232.229.177.
Because the Received: fields are prepended to the email header, the
oldest field is located at the very bottom of the header block.
In the example header above, there are only two Received: fields;
the oldest one records the 173.232.229.177 IP address.
This will be the IP address of the machine which initially sent out this email,
which should correspond to the ultimate origin of the email message.
This is the most important takeaway:
The last
Received:field appearing in an email message header points to the origin of an email, in the form of an IP address or server’s name (host name). This field corresponds to the earliest point of the email’s transmission.
(Today, with the prevalence of cloud computing, the mail servers may not be physically located at the institutions, but the principle remains the same: that the email was routed from one mail server to another until it reaches the destination server.)
Deciphering the Email’s Country of Origin
Now that we have determined the IP address or the computer’s name of the email origin, our next job is to determine the country of origin of the email message. An IP address is associated with a country and an organization. This is a publicly known information, since they are officially maintained by various registries at the regional, country, and international levels. There are internet services which provide mapping from IP to a geographical location (“geolocation”) such as country, city, and even approximate geo-coordinates. We will be using one of such a free service to map the IP address to the country. Because of the intensity of our query, we will be using a downloaded database to provide that mapping function.
What Is an IP Address?
An IP address is usually expressed in terms of a quartet of integers, such as
128.82.112.29(this was the IP address ofwww.odu.edu). Each integer is in the range of 0 through 255 (inclusive). This address is actually a 32-bit integer (broken into four 8-bit integers). For the example IP address above, the 32-bit number can be computed in this way (where**refers to the exponentiation operator):128 * 256**3 + 82 * 256**2 + 112 * 256 + 29 = 2,152,886,301The schema above refers to the “classic” IP address, also known as IPv4, which provides up to 4.3 billion unique addresses. In the newer protocol, IPv6, an IP address is a 128-bit number, thus it can accommodate enormously more devices connected to the global network; (about 1038 addresses). We will not work with IPv6 address format in this lesson.
Information Veracity: The Devil in the Detail
Astute readers would notice that the IP address shown above,
173.232.229.177, actually were associated with two host names:quebec.terocrif.bidandgo1-longer.lgol.net. Why the apparent conflicting information, you may ask?go1-longer.lgol.netis the host name returned by the IP reverse lookup. (On a Linux or Mac OS terminal, you can do a reverse IP lookup by invoking eitherhost 173.232.229.177ornslookup 173.232.229.177.) The namequebec.terocrif.bidwas claimed by the sending server itself. In this case, annslookupcall for either hostname would point to the same IP address; but sometimes a server can lie. The point is, that the IP address is the most likely one to be the trustworthy information of all these bits. Even then, a spammer may add phonyReceived:field(s) in order to obfuscate his mode of operation–and we have observed that in our dataset (one example will be shown below). In our exercise, we will assume that allReceived:fields are honest. A thorough analysis of email headers would be out of the scope of this training—it will be too big a digression for the fun thing we are about to do: being able to run computations on a supercomputer!
About the Datasets
There are two datasets that we will be using in the hands-on activities in this lesson:
-
The “SPAM Archive”, a spam email collection curated by Bruce Guenter and published at untroubled.org.
-
An open, freely downloadable database of IP geolocation mapping as provided by IPInfoDB. We are using the DB1.LITE database from this website, which maps ranges of IP addresses to the countries.
The Untroubled Spam Collection
A snapshot of the “Untroubled” SPAM archive was downloaded on September 2018 from http://untroubled.org/spam/. It contains emails classified as “spam” from March of 1998 through September of 2018. There is a total of over 85 million emails in this dataset, and the rate of SPAM received is increasing by the year. The total uncompressed size of the data is over 45 GB. For an average person, it is a formidable monster to process.
How Was the Spam Archive Created?
It is actually quite easy to create a spam collection like the SPAM Archive. The curator, Mr. Guenter, simply published his email address on various Internet venues such as mailing lists, websites, forums, etc. A special spam filter was employed which automatically dumps emails classified as “spam” into separate folders.
While Internet provides us with ease of finding information, staying in touch with people that we care, convenience in doing business online, it is also a hostile place that are dangerous to the uninitiated. Along with legitimate websites and services, many bots, malware, viruses are operating or spreading rampantly. Some bots perform attacks on underprotected computers—some targeted and some randomly. Yet other malicious bots harvest email addresses automatically by crawling through websites, internet forums, mailing lists, etc. to build a list for hackers to misuse. Hackers would then employ other types of bots to perform mass spamming to these harvested email addresses. Because these processes are very easy to do, we suffer from the rampant spam problem as we know it today. This is why we should protect our email addresses from unnecessary exposure.
The IP Geolocation Mapping
IP addresses are assigned to a certain organization (and, by extension, a certain country) by a range of the 32-bit numbers. The DB1.LITE database provides a very simple table that looks like this:
| min_ip | max_ip | country_code | country |
|---|---|---|---|
| 0 | 16777215 | - | - |
| 16777216 | 16777471 | AU | Australia |
| 16777472 | 16778239 | CN | China |
| 16778240 | 16779263 | AU | Australia |
| 16779264 | 16781311 | CN | China |
| 16781312 | 16785407 | JP | Japan |
| … | … | … | … |
| 3758095872 | 3758096127 | SG | Singapore |
| 3758096128 | 3758096383 | AU | Australia |
| 3758096384 | 4294967295 | - | - |
Here, country_code refers to the two-letter country code.
We will use this table to look up the country associated with a certain IP address.
All IP addresses in the range of min_ip through max_ip (inclusive endpoints)
belong to a certain country.
You can see that IP addresses are generally associated to a country
in multiple blocks of IP addresses;
they are not contiguous, nor do they have predictable patterns.
You also see that some IP address range are not assigned to a country:
They are either reserved for internal purposes,
or have not been assigned to any country.
Now, how do we make use of the database above to
match an IP address to its country?
To do so, a computer program must perform a lookup procedure,
by essentially searching through the entire database for the
row where (min_ip, max_ip) brackets the said IP address.
This is a costly operation.
For this reason, analyzing the countries-of-origin for a large number of emails
is a computationally expensive task, which is a suitable workload
for a high-performance computer.
Find Out the Country!
Using the approach described above, please look up the countries corresponding to these IP addresses:
- 1.0.7.115
- 223.255.254.129
Solution
1.0.7.115is equivalent to integer 16779123. Using the excerpt of the BD1.LITE table above, this IP address maps to Australia, where (min_ip, max_ip) = (16778240, 16779263).
223.255.254.129is equivalent to integer 3758095872, which maps to Singapore.
Accessing and Exploring SPAM Archive Dataset
Mandatory: Accessing SPAM Archive
Please go to the
~/CItraining/module-hpc/Spam_bashdirectory where you will be working throughout this episode. It contains various files for hands-on activities for spam analysis.Activities in this section are important to make the SPAM Archive dataset available for the remaining exercises in this lesson. Please do not skip any steps or exercises in this section.
Check the contents of the Spam_bash directory:
$ pwd
$ ls -l
/home/USER_ID/CItraining/module-hpc/Spam_bash
total 5044
-rw-r--r-- 1 wpurwant wpurwant    2532 Jul  8 06:07 About-spam_ip-script.md
-rw-r--r-- 1 wpurwant wpurwant 5136384 Jun 19 00:11 IP2LOCATION-LITE-DB1.sqlite
-rwxr-xr-x 1 wpurwant wpurwant     504 Jun 19 00:11 Load-datasets.sh
drwxr-xr-x 2 wpurwant wpurwant    4096 Jun 19 00:11 results
drwxr-xr-x 2 wpurwant wpurwant    4096 Jun 19 00:11 solutions
-rwxr-xr-x 1 wpurwant wpurwant    3037 Jul  8 19:24 spam_ip.sh
-rwxr-xr-x 1 wpurwant wpurwant    1014 Jul  8 08:12 spam_ip_barebone.sh
drwxr-xr-x 2 wpurwant wpurwant    4096 Jun 25 04:47 templates
Nowhere can we see a reference into the spam dataset.
In order to make the SPAM Archive dataset accessible to learners,
a script called Load-dataset.sh has been prepared
in the Spam_bash folder.
Invoke this script with no argument:
$ ./Load-dataset.sh
Now check the contents of the directory:
$ ls -l
total 5044
lrwxrwxrwx 1 wpurwant wpurwant      59 Jul 12 07:03 1998 -> /cm/shared/courses/DeapSECURE/datasets/untroubled-spam/1998
lrwxrwxrwx 1 wpurwant wpurwant      59 Jul 12 07:03 1999 -> /cm/shared/courses/DeapSECURE/datasets/untroubled-spam/1999
-rw-r--r-- 1 wpurwant wpurwant    2532 Jul  8 06:07 About-spam_ip-script.md
-rw-r--r-- 1 wpurwant wpurwant 5136384 Jun 19 00:11 IP2LOCATION-LITE-DB1.sqlite
-rwxr-xr-x 1 wpurwant wpurwant     504 Jun 19 00:11 Load-datasets.sh
drwxr-xr-x 2 wpurwant wpurwant    4096 Jun 19 00:11 results
drwxr-xr-x 2 wpurwant wpurwant    4096 Jun 19 00:11 solutions
-rwxr-xr-x 1 wpurwant wpurwant    3037 Jul  8 19:24 spam_ip.sh
-rwxr-xr-x 1 wpurwant wpurwant    1014 Jul  8 08:12 spam_ip_barebone.sh
drwxr-xr-x 2 wpurwant wpurwant    4096 Jun 25 04:47 templates
Two shortcuts were provided (1998 and 1999),
which provide access to the spam data from the years 1998-1999.
These are actually shortcuts to the 1998 and 1999 folders
under /cm/shared/courses/DeapSECURE/datasets/untroubled-spam,
which is a shared directory to hold the actual spam data.
(Your location may vary from this,
if the workshop was held using a different HPC system.)
Loading Samples from Other Years
On Wahab cluster, spam samples are available from years 1998 through (at least) part of 2018. To access spam samples from a particular year, invoke
$ ./Load-datasets.sh YEARReplace
YEARwith the desired year (e.g. 2000, 2002, and so on). Multiple years can be given, for example:./Load-datasets.sh 2000 2001 2022.
Exploring the SPAM Archive Collection
Let us explore the spam collection for a little bit so that you become familiar with its structure and contents.
- First,
cdinto~/CItraining/module-hpc/Spam_bashdirectory. Then step further into1998directory and list its contents. What did you see? Can you make sense what these are?- Go into one of the directories (e.g.
03) and list its contents: What did you see?- View a couple of files using the
lesscommand to get a sense of the content of the spam emails. Can you recognize the email header? Look for theReceived:fields and identify the IP addresses, if they exist.WARNING: The spam collection contains very large number of files.
Solution (Partial)
The spam mails were organized by the month. Under the
1998directory, we see ten months of data (03,04, … through12). (It is quite likely that the collection effort started in March 1998, in which case there were no earlier month.)Each subdirectory such as
03or04contain emails that were collected during that particular month. For example:$ cd ~/CItraining/module-hpc/Spam_bash/1998 $ ls -l 03/ | head -n 12total 276 -rw-r--r-- 1 tjones users 5929 Mar 26 1998 890929468.24864.txt -rw-r--r-- 1 tjones users 7678 Mar 26 1998 890929472.24865.txt -rw-r--r-- 1 tjones users 6034 Mar 26 1998 890929475.24866.txt -rw-r--r-- 1 tjones users 3732 Mar 26 1998 890929479.24867.txt -rw-r--r-- 1 tjones users 2615 Mar 26 1998 890929482.24868.txt -rw-r--r-- 1 tjones users 3728 Mar 26 1998 890929485.24869.txt -rw-r--r-- 1 tjones users 6047 Mar 26 1998 890929489.24870.txt -rw-r--r-- 1 tjones users 13995 Mar 26 1998 890929492.24871.txt -rw-r--r-- 1 tjones users 11231 Mar 26 1998 890929496.24872.txt -rw-r--r-- 1 tjones users 2166 Mar 26 1998 890929499.24873.txt -rw-r--r-- 1 tjones users 5424 Mar 26 1998 890929562.24883.txtEach file corresponds to one spam email. Look around other subdirectories and observe any similiarities or differences, if any.
Consider one sample of the spam file,
03/890929468.24864.txt. The header is shown on the top part of the file, terminated by an empty line:Return-Path: <aj881c@ix.netcom.com> Delivered-To: bguenter-bait@mikhail.qcc.sk.ca Received: (qmail 881 invoked by alias); 1 Feb 1998 08:47:36 -0000 Delivered-To: bait@mikhail.qcc.sk.ca Received: (qmail 875 invoked from network); 1 Feb 1998 08:47:35 -0000 Received: from iis.cybermania.net (208.135.0.2) by mikhail.qcc.sk.ca with SMTP; 1 Feb 1998 08:47:35 -0000 Received: from [204.31.253.89] by iis.cybermania.net (SMTPD32-3.03) id A5CC641B01EA; Sun, 01 Feb 1998 03:43:56 -0500 From: aj881c <aj881c@ix.netcom.com> To: <bagpipes@acadia.net> Received: from SMTP.XServer (Smail4.1.19.1 #20) id m0wBzN7-009vdR; Sunday, February 1st, 1998 Received: from mail.apache.net(really [164/187]) by relay.comanche.com Friday, January 30th, 1998 Received: from 32776.21445(really [80110/80111]) by relay.denmark.nl Wednesday, January 28th, 1998 Received: from local.nethost.org(really [24553/24554]) by relay.SS621.net Tuesday, January 27th, 1998 Message-Id: <19943672.886214@relay.comanche.denmark.eu> Monday, February 2nd, 1998 Reply-To: aj881c@ix.netcom.com Authenticated sender is <aj881c@ix.netcom.com> Subject: 2-1 Mime-Version: 1.0 Content-Type: text/plain; charset="us-ascii" Content-Transfer-Encoding: 7bitThe blank line is a cue to the mail reader that the rest is the mail body.
The
grepcommand can help us focus on the tracking info:$ grep Received: 1998/03/890929468.24864.txtReceived: (qmail 881 invoked by alias); 1 Feb 1998 08:47:36 -0000 Received: (qmail 875 invoked from network); 1 Feb 1998 08:47:35 -0000 Received: from iis.cybermania.net (208.135.0.2) Received: from [204.31.253.89] by iis.cybermania.net Received: from SMTP.XServer (Smail4.1.19.1 #20) id m0wBzN7-009vdR; Sunday, February 1st, 1998 Received: from mail.apache.net(really [164/187]) by relay.comanche.com Friday, January 30th, 1998 Received: from 32776.21445(really [80110/80111]) by relay.denmark.nl Wednesday, January 28th, 1998 Received: from local.nethost.org(really [24553/24554]) by relay.SS621.net Tuesday, January 27th, 1998
An Example of In-depth Cybersecurity Analysis (Advanced)
Once we have looked into the contents some files, we can focus only on the
Received:field by using thegrepcommand. This exercise is meant to guide you to attempt some in-depth analysis of the spam issues, which may be of interest to learners who has a strong cybersecurity background.For this exercise, start in the
~/CItraining/module-hpc/Spam_bashdirectory. Let us look at more samples of email headers and compare among them:
- Email 1:
1998/03/890929468.24864.txt- Email 2:
1998/03/890929472.24865.txt- Email 3:
1998/03/890929569.24885.txt- Email 4:
2018/01/1514898318.13268_227.txt(optional)(The last one requires the loading of 2018 dataset by invoking
./Load-datasets.sh 2018.)Which
Received:fields look legitimate in these email headers? Do you spot any forgedReceived:fields?Solution (Partial)
Let us start by filtering the tracking fields with the
grepcommand:$ grep Received: 1998/03/890929468.24864.txtReceived: (qmail 881 invoked by alias); 1 Feb 1998 08:47:36 -0000 Received: (qmail 875 invoked from network); 1 Feb 1998 08:47:35 -0000 Received: from iis.cybermania.net (208.135.0.2) Received: from [204.31.253.89] by iis.cybermania.net Received: from SMTP.XServer (Smail4.1.19.1 #20) id m0wBzN7-009vdR; Sunday, February 1st, 1998 Received: from mail.apache.net(really [164/187]) by relay.comanche.com Friday, January 30th, 1998 Received: from 32776.21445(really [80110/80111]) by relay.denmark.nl Wednesday, January 28th, 1998 Received: from local.nethost.org(really [24553/24554]) by relay.SS621.net Tuesday, January 27th, 1998There is a lot of information here! But let us also compare these with the fields stored in the other email to get a sense of the contents. For example,
$ grep Received: 1998/03/890929569.24885.txt
Received: (qmail 11805 invoked from network); 26 Mar 1998 02:56:06 -0000
Received: from linus.vsource.com (root@198.169.201.2)
Received: from internet3.ideasign.com ([208.230.216.4]) by linus.vsource.com (8.8.7/8.6.9) with ESMTP id UAA08458 for <bguenter@gemprint.com>; Wed, 25 Mar 1998 20:56:01 -0600
Received: from Default ([206.175.229.130]) by internet3.ideasign.com
Compare the last four
Received:fields above with those from another sample email, e.g.: It may not be obvious to the uninitiated, but we see telltale signs of forged header data in the last fourReceived:lines in the first email file we examined (1998/03/890929468.24864.txt):
- They contain no IP addresses
- Some of the host names seem to be made up (like,
32776.21445).- The tracking info has inconsistencies. A valid sequence of
Received:records should form an unbroken chain which tracks how the messages have been transmitted from server to server. The second email shows a clear transmission of the email message from206.175.229.130, to208.230.216.4, then to198.169.201.2. In the first email, the first four tracking fields show disjointed transmission, e.g. fromlocal.nethost.orgtorelay.SS621.net, then from32776.21445(a bogus host name) torelay.denmark.nl, and so on.Some options of
grepsuch as-A,-C, and-ncan shed more light on the context of these fields. See [grepmanual page][man-grep] for an explanation of these options.$ grep -n -A3 Received: 1998/03/890929468.24864.txt3:Received: (qmail 881 invoked by alias); 1 Feb 1998 08:47:36 -0000 4-Delivered-To: bait@mikhail.qcc.sk.ca 5:Received: (qmail 875 invoked from network); 1 Feb 1998 08:47:35 -0000 6:Received: from iis.cybermania.net (208.135.0.2) 7- by mikhail.qcc.sk.ca with SMTP; 1 Feb 1998 08:47:35 -0000 8:Received: from [204.31.253.89] by iis.cybermania.net 9- (SMTPD32-3.03) id A5CC641B01EA; Sun, 01 Feb 1998 03:43:56 -0500 10-From: aj881c <aj881c@ix.netcom.com> 11-To: <bagpipes@acadia.net> 12:Received: from SMTP.XServer (Smail4.1.19.1 #20) id m0wBzN7-009vdR; Sunday, February 1st, 1998 13:Received: from mail.apache.net(really [164/187]) by relay.comanche.com Friday, January 30th, 1998 14:Received: from 32776.21445(really [80110/80111]) by relay.denmark.nl Wednesday, January 28th, 1998 15:Received: from local.nethost.org(really [24553/24554]) by relay.SS621.net Tuesday, January 27th, 1998 16-Message-Id: <19943672.886214@relay.comanche.denmark.eu> Monday, February 2nd, 1998 17-Reply-To: aj881c@ix.netcom.com 18-Authenticated sender is <aj881c@ix.netcom.com>The
-A 3option prints up to 3 context lines after every matching line, whereas the-ndisplays the line number before the text. As shown above, we ended up printing lines 3-18 of the email file. Thegrepoutput exposes that the first fourReceived:fields were added before theFrom:andTo:, which is not normal. The message ID line claims February 2 as the date (but no time part), and the time stamps are not ordered correctly (e.g., the firstReceived:was dated January 27, 1998, which did not make sense if the message ID stamp was truly February 2).This kind of analysis shows the challenges faced by cyber analyst, which have to sort through a lot of information, which may include reliable, unreliable, and downright false information. A large part of the analysis above can be automated with appropriate software tools (or programs), but ultimately the analyst must use his/her judgment to come to a reasonable conclusion.
Putting All Together: The spam_ip.sh Script
Go to Your
Spam_bashFolderPlease make sure that you are located in the
~/CItraining/module-hpc/Spam_bashdirectory, where you will be working for the rest of the lesson analyzing spam emails.
In this section, we introduce a simple bash script called spam_ip.sh,
which perform all the steps described earlier, in order to determine
countries of origin for a given set of emails.
The script was written for Bourne shell and is very short. When all comments are stripped, the barebone code contents are only 30 lines long:
#!/bin/bash
EMAIL_DIR=$1
IP2LOCATION_DATABASE=$HOME/CItraining/module-hpc/Spam_bash/IP2LOCATION-LITE-DB1.sqlite

for EMAIL in "$EMAIL_DIR"/*
do
    IP=$(cat "$EMAIL" \
           | grep -a "^Received:" \
           | grep -a -E -o "(25[0-5]|2[0-4][0-9]|[01]?[0-9][0-9]?)\.(25[0-5]|2[0-4][0-9]|[01]?[0-9][0-9]?)\.(25[0-5]|2[0-4][0-9]|[01]?[0-9][0-9]?)\.(25[0-5]|2[0-4][0-9]|[01]?[0-9][0-9]?)" \
           | tail -n 1)

    if [ -z "$IP" ]; then
        echo "${EMAIL}||Fail to get source IP|"
    else
        NUM1=$(echo "$IP" | cut -d . -f 1)
        NUM2=$(echo "$IP" | cut -d . -f 2)
        NUM3=$(echo "$IP" | cut -d . -f 3)
        NUM4=$(echo "$IP" | cut -d . -f 4)
        IP_INT=$(( $NUM1 * 16777216  +  $NUM2 * 65536  +  $NUM3 * 256  +  $NUM4 ))
        QUERY="SELECT country_code, country FROM IP_Country WHERE (min_ip <= $IP_INT) AND ($IP_INT <= max_ip);"

        CC2_COUNTRY=$(echo "$QUERY" | sqlite3 -separator '|' "$IP2LOCATION_DATABASE")
        echo "${EMAIL}|${IP}|${CC2_COUNTRY}"
    fi
done
This script is provided as the spam_ip.sh file
in your hands-on folder (Spam_bash).
A few comments are helpful to describe the script:
-
The script takes in one argument, which is the name of a folder containing spam emails that we want to analyze.
-
An outer loop goes over all the files (emails) in the specified folder.
-
For every email, a complex pipeline of
grepcommands is used to locate theReceived:fields, then extract the IP address. Only the last IP address encountered in the header is retained. -
The four numbers in the IP address are converted to the equivalent 32-bit integer.
-
At this point, an IP-to-country lookup process is performed over the rows of the lookup table in the DB1.LITE database. This lookup was programmed in a short SQL (Structured Query Language) program, executed by the
sqlite3program. This is perhaps the “blackbox” of the entire script, which we will not explain further, except to mention that this lookup results in a twofold result: The two-letter country code, followed by the country’s name.
Now we are about to experiment with running programs on HPC.
We will begin by running spam_ip.sh as our first workload.
However, we must take care of one thing before launching that.
Obtaining a Terminal Session on HPC Compute Node
One important etiquette on a shared HPC system is that we should not run workloads that are heavy in CPU or memory utilization on the login node. You are placed on the HPC’s login node when you first connect to HPC. So the first step to do before running interactive workload is to obtain an interactive shell session on one of the HPC’s compute nodes.
On other SLURM systems in general, you can run the srun command
with the arguments shown below,
$ srun -t 4:00:00 -n 1 --pty bash
Here is an example input and output complete with the shell prompts:
USER_ID@wahab-01:~/CItraining/module-hpc/Spam_bash$ srun -t 4:00:00 -n 1 --pty bash
srun: job 3353939 queued and waiting for resources
srun: job 3353939 has been allocated resources
USER_ID@d6-w6420b-01:~/CItraining/module-hpc/Spam_bash$
In the example above, wahab-01 in the shell prompt refers to the name of the login node,
whereas d6-w6420b-01 refers to the compute node allocated by the job scheduler
for this shell session.
The shell on the compute node will start in the same directory
as the original shell in the login node.
(Please check with the pwd command to confirm.
If this is not the case, please issue a
cd ~/CItraining/module-hpc/Spam_bash command.
The invocation of srun above has three flags: -t, -n, and --pty.
The -t flag, as we will learn later, indicates the time limit of the session.
In the invocation shown above, it will be four hours.
You can adjust this to the right length of time that you anticipate
to use the shell interactively.
All HPC Clusters Are Different!
Your instructor may give you additional flags to use if your HPC site requires additional flags to run the interactive job. Some HPC sites even provide a specialized command (such as
interactinstead ofsrun) to launch an interactive shell sessions. Please closely follow your instructor in this case. The following sidebar applies only for ODU’s HPC clusters such as Wahab.
Wahab’s Shortcut for Interactive Session
If you run this exercise on ODU’s Wahab HPC system, you can simply type
sallocand wait until the shell prompt changes to indicate you are now running on a compute node:$ salloc -t 4:00:00Adding
-t 4:00:00is optional on Wahab, but is a nice gesture (see below). If the-tflag is not specified on Wahab, the default time limit is 7 days.Once the shell prompt reappears, we are ready to run our program.
A Note on Time Limit
Time limit is a very important resource specification in HPC. Since this is a shared machine, our use of a particular compute node or resource must be limited so that others can use it too. This also means that we ought to be wise in specifying something too much that you will leave idle. For example, requesting a shell session that lasts for 24 hours means that a part of the HPC compute node will not be available for use by others for 24 hours. If you leave that shell session idle for a long time (e.g over 1 hour), that is a waste of resource. It is better to exit the session and obtain another interactive shell session later if you anticipate a long break.
Running spam_ip.sh
Before You Run
REQUIRED Load the “DeapSECURE” software module to access the software required for this training:
$ module load DeapSECUREMake sure that you are located in
Spam_bashfolder where thespam_ip.shis located.Obtain an interactive shell on the compute node (see the previous subsection).
Gain access to the desired year, if you have not already.
$ ./Load-datasets.sh 1998
Run the spam_ip.sh script with the spam directory as its argument.
For example:
./spam_ip.sh 1998/03
The script will analyze all the files contained in the subdirectory 1998/03,
i.e., the spam emails gathered in March 1998.
Here are the first and last few lines of the analysis output:
1998/03/890929468.24864.txt|4.1.19.1|US|United States
1998/03/890929472.24865.txt|153.37.75.113|CN|China
1998/03/890929475.24866.txt|4.1.19.1|US|United States
1998/03/890929479.24867.txt|209.84.113.62|US|United States
1998/03/890929482.24868.txt|153.36.90.245|CN|China

...

1998/03/891272355.532.txt|204.126.205.203|US|United States
1998/03/891275675.11190.txt|193.188.135.2|LB|Lebanon
1998/03/891275686.11191.txt|142.66.35.29|CA|Canada
1998/03/891285044.11747.txt|209.86.93.47|US|United States
1998/03/891285049.11748.txt|203.147.0.3|TH|Thailand
The full output can be viewed in the following file: spam_ip-1998-03.txt. For every email analyzed, the script will print one line containing four fields:
1998/03/890929468.24864.txt|4.1.19.1|US|United States
The meaning of each field is as follows:
| Field | Description | Example (from line 1 above) |
|---|---|---|
| 1 | The email filename | 1998/03/890929468.24864.txt |
| 2 | The originating IP address | 4.1.19.1 |
| 3 | Country code (two letters) | US |
| 4 | Country name | United States |
Try running the analyzer for other year/month combinations to see if the spam trends are the same or different for those months.
Key Points
A spam database is a collection of spam emails that have been gathered over many years to provide a representation of spam circulating on the Internet.
A spam database such as the SPAM Archive is helpful to study the characteristics of spam emails, including their origins.
The origin of an email can be determined from the IP address recorded in the tracking information in the email’s header.
An IP address can be mapped to a geographic location using an appropriate database.