Accessing HPC
Overview
Teaching: 5 min
Exercises: 5 minQuestions
How do we access a modern HPC system?
How do we interact with a basic HPC interface?
Objectives
Connecting to an HPC system using secure shell
An Overview of a Common HPC Architecture
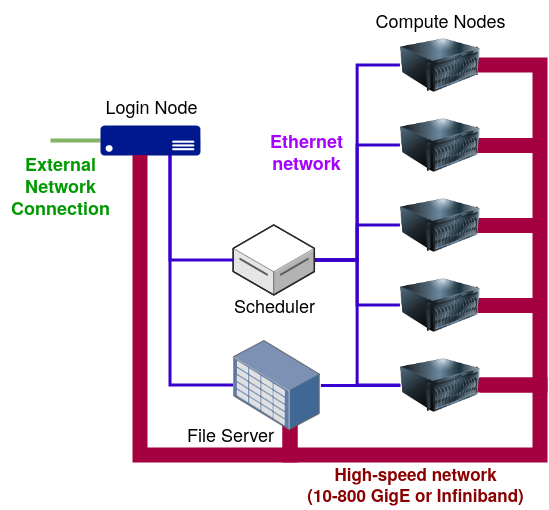
Today, an HPC (a supercomputer) commonly takes the form of a cluster of servers—also called “nodes”—that are tightly connected using high-performance networks. (Because of this, the term “cluster” is often used interchangeably with “HPC”.) The following schematic diagram shows a typical graphical representation of a standard HPC architecture:

FIXME: Add explanation of the major components here.
About Wahab HPC Cluster
Wahab is an high-performance computer (HPC), or supercomputer, that is physically located in the ITS data center, at the Old Dominion University’s Norfolk campus.
Wahab features up to 6320 CPU cores and 72 GPU cores, making it incredibly powerful for complex computing tasks. For more information about Wahab, including its capabilities, usage, and how to access it, you can visit https://wiki.hpc.odu.edu/. This site will provide detailed insights into the supercomputer, its resources, and how it supports research and academic projects.
| Node Type | Total Nodes | Total Cores |
|---|---|---|
| Login | 2 | 20 |
| Standard Compute | 158 | 6320 |
| GPU | 18 | 512 |
| GPU (high memory) | 7 | 448 |
| DGX A100 | 1 | 40 |
| DGX H100 | 1 | 112 |
Think about it!
How many CPU cores and how much RAM does your laptop have? How does it compare to a compute node on Turing?
If you have a computation that takes 24 hours to complete on your laptop (assuming it takes advantage of all the CPU cores), what is the shortest amount of time it could potentially take to complete on a single compute node on Turing that has 32 CPU cores? Assume that the CPU speed (clock frequency) is the same in both cases.
Wahab cluster uses Rocky Linux as its operating system (OS). Linux is a free UNIX-like operating system.
In addition to the compute nodes, there are additional servers that perform other tasks, such as serving the files that are used by the users, and “login node”. (We will cover storage and data transfer in a latter part of this training.) Login node is the computer that interacts directly with the users when they first connect to an HPC cluster.
Accessing an HPC System
High-Performance Computing (HPC) systems like Wahab are powerful supercomputers that are accessed remotely via the internet and shared among many users. Traditionally, HPC users have been employing a Secure Shell (SSH) client to securely access and interact with HPC systems from their personal computers. However, newer methods have been devised to accommodate diverse needs and preferences. In this lesson, we will begin by introducing learners to Open OnDemand, which is a web-based method to access HPC resources and capabilities.
Web-based Access through Open OnDemands
Open OnDemand (sometimes shortened “OnDemand”) is a web-based interface designed to provide intuitive, user-friendly access to high-performance computing (HPC) resources. In contrast to other methods such as SSH, this interface requires only a web browser (there is no need for additional software to be installed, or complex setup from the user’s side). Open OnDemand is suitable for new users who do not have much experience in command-line interface, or those who prefer a graphical interface.
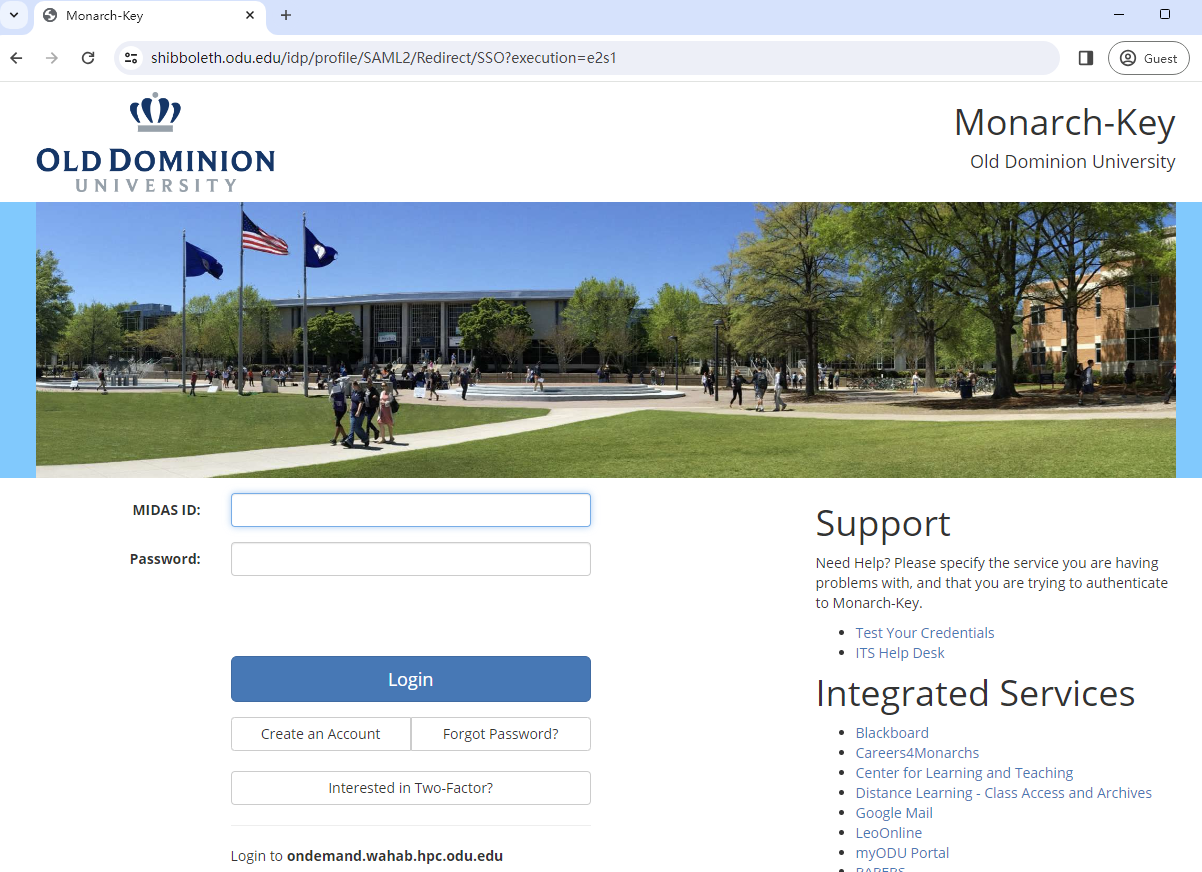
To access Wahab HPC, go to https://ondemand.wahab.hpc.odu.edu/ using one of the following recommended web browsers: Google Chrome, Mozilla Firefox, or Microsoft Edge. (Please refer to OnDemand’s documentation for more information.) You will be presented with the login page shown below; please input your MIDAS ID and password to proceed:

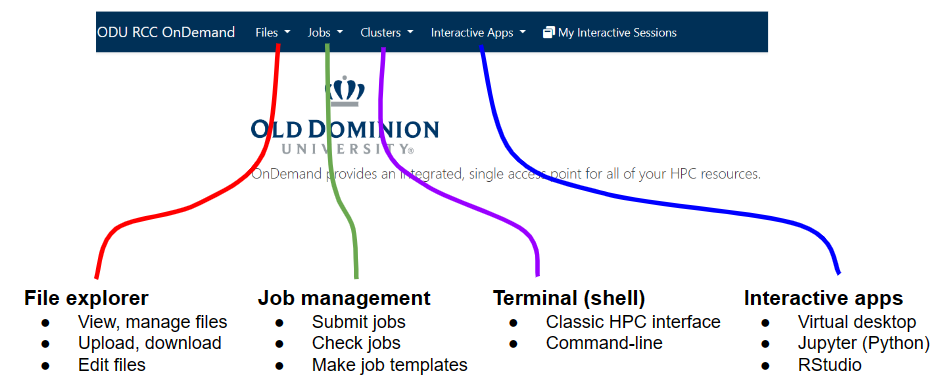
(Some users will be required to use a two-factor authentication such as a numerical code sent via SMS, or a push notification via Duo.) If your login is successful, you will see the Open OnDemand’s front page (also known as dashboard):

Open OnDemand’s Main Capabilities
The OnDemand dashboard contains four major menu items:
-
The Files menu contains a graphical file manager to view and manage user’s files stored on the HPC system.
-
The Jobs menu provides an interface to view and manage user’s jobs. It also has a job composer to facilitate the creation of job scripts.
-
The Clusters menu provides access to shell access to the cluster’s login node.
-
The Interactive Apps menu contains various interactive applications that run on HPC’s powerful compute nodes to enable computing and analysis works that require large amounts of memory and/or computing power (including GPU accelerator).
Managing Files with Open OnDemand
Let’s learn how to use OnDemand’s graphical file manager. From the Files menu, click the Home Directory:

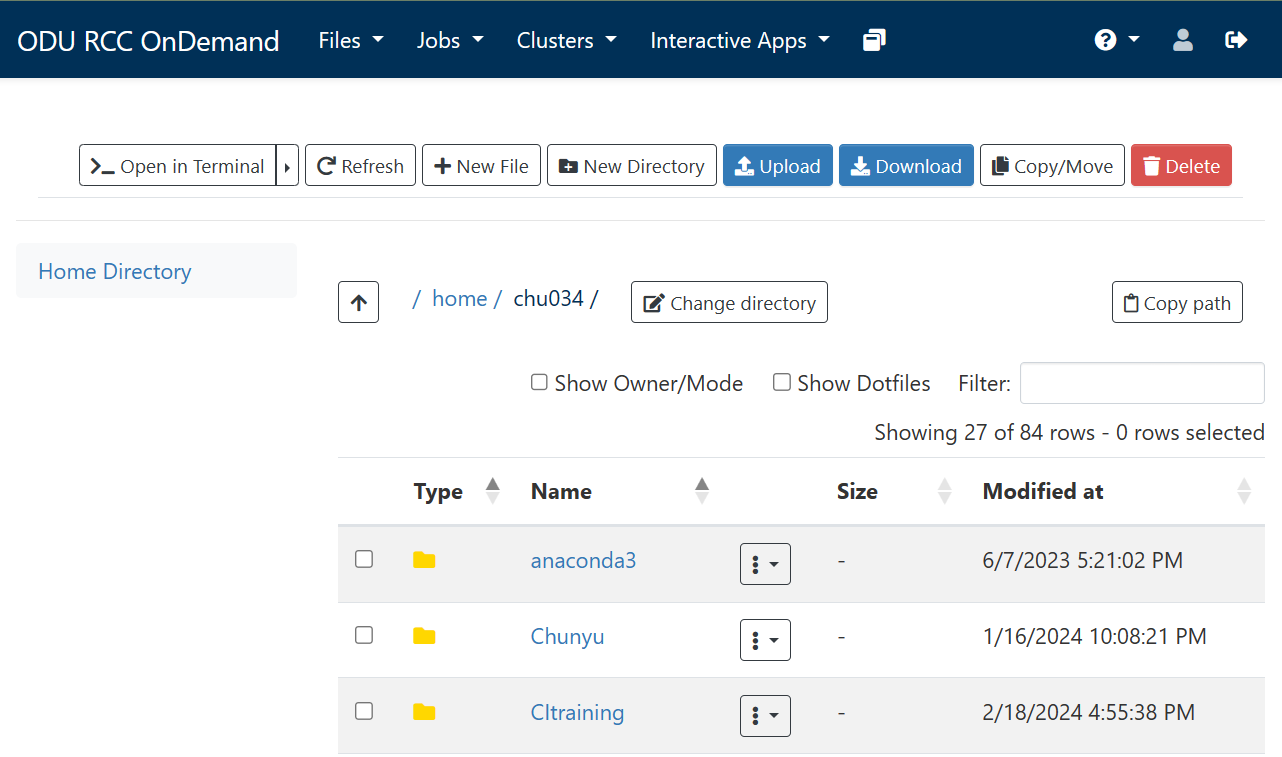
We will see the web-based interface for file manager:

Underneath the main menubar (colored navy blue above), there is a toolbar that provide some general functions, such as:
-
Open in Terminal: Open the current folder in a shell (terminal) interface.
-
New File and New Directory: Creates new (empty) file or directory (respectively) in the current folder. The file manager will ask the name of the file or folder.
-
Upload: Uploads a file from the user’s local computer (device) to the HPC filesystem.
-
Download: Downloads one or more file or a folder from the HPC filesystem to the user’s local computer (device). (The files and/or folders must be selected by checking the box to the left side of the file/folder names.)
There are other functions that are similar to those available in file managers such as Windows Explorer (in Windows), or Finder (in MacOS).
Underneath the toolbar row, you will see the full path of the current folder
(which, in the screenshot above is /home/chu034).
This is your home directory (or home folder), which for generality,
will be written as /home/USER_ID.
It is understood throughout this lesson that USER_ID will be substituted with
your own user ID on the HPC system
(for ODU students, faculty and staff, this will be their MIDAS ID).
Creating Folders and Files
Mandatory Exercise
This is a mandatory exercise since the files and folders created in this section will be used in latter parts of this lesson.
Let us create some folders and files using this file manager.
First, create a folder named CItraining in your home directory.
Navigate into the CItraining folder, then create another folder called ondemand.
Next, navigate into the ondemand folder.
(As a checkpoint, the full path of the current folder should now read:
/home/USER_ID/CItraining/ondemand.)
Within this folder, now create a file named hello.sh.
To edit the hello.sh file, click the three-dot menu button next to the file name.
Select Edit from the drop-down menu, which will launch the web-based editor.
Please type the following contents exactly as they appear below:
#!/bin/bash
echo 'Hello World'
cat message.txt
Uploading and Downloading Files to/from HPC
The next step involves creating a text file called message.txt in the user’s local computer
and uploading it to the HPC.
Create this using your favorite text editor,
such as Notepad in Windows or TextEdit in MacOS.
(Note: When creating a text file with TextEdit, you will have to make sure that it is plain text
[menu: Format –> Make plain text].)
Fill this text file with a few lines of word(s) and/or paragraph(s).
Save this file, and note the location of the files.
Back to the OnDemand’s file manager interface, use the Upload button located on the toolbar
to upload the newly created message.txt to HPC.
Please make sure that you are uploading to the /home/USER_ID/CItraining/ondemand folder on HPC.
As a bonus exercise, please download hello.sh from HPC to user’s local computer.
To confirm the correct download operation, examine the contents of hello.sh
using a local text editor.
Accessing HPC Login Node via Shell
As a segway to the next episode, let’s use the Wahab Shell Access under the Cluster menu to open a terminal to access Wahab’s login node:

Once logged in, you will be greeted with a prompt that looks like this:
[USER_ID@wahab-01 ~]$
This is the prompt of the UNIX shell, which, in this case is tcsh. We will cover the basic interaction with UNIX shell in the next episode.
A few items printed on the shell prompt are worth explaining here:
-
wahab-01: This is
wahab-01, which is Wahab cluster’s login node. In the UNIX world, the name of the computer is printed on the prompt: it is very common for a UNIX user to make connections to many remote computers from a single computer, therefore this bit of information is extremely important! -
USER_ID: Your user ID is printed on the prompt.
-
The
~(tilde) character in the prompt above denotes your home directory. This is the current working directory of the shell. We will learn more about this in the next episode.
Terminal-based through terminal application
HPC systems are remotely accessed via Internet and shared among many users. Typically, a secure shell (ssh) client is used to access these systems. Interaction and data transfer between user’s computer and Turing takes place through a secure, encrypted channel.
Wahab cluster has following Internet address:
wahab.hpc.odu.edu
Use your ODU MIDAS username and password to connect to Wahab login node.
In the following section and throughout the workshop, please substitute
the string USER_ID with your own user ID.
Access from Mac OS X and Linux Computers
For Mac, Linux, and other UNIX(-like) systems, open your terminal
program and type
$ ssh USER_ID@wahab.hpc.odu.edu
Then follow prompt to enter password. (There is no character printed on the screen when you type your password. This is normal; just continue.)
Access from Windows Computers
For Windows users you can utilize the built-in Windows Terminal or PowerShell, which support SSH directly without the need for external software. This approach simplifies access to remote servers and integrates well with the Windows operating system environment. Here’s how to use it:
- Opening PowerShell
Click the Start menu button or press the Windows key.
Type PowerShell.
Click on the Windows PowerShell application to open it.
When you open PowerShell, type
$ ssh USER_ID@wahab.hpc.odu.edu
Quick Note
Whether you access the cluster using on demand or terminal, you are accessing the exact same Wahab login node and computing environment. Both methods lead to the same results.
Exercise: Connecting to Wahab
Now, it’s time for action! Please connect to Wahab using the appropriate SSH client for your machine. Make sure that you are to establish connection.
Please try the following commands on your terminal:
[USER_ID@wahab-01 ~]$ whoami
USER_ID
[USER_ID@wahab-01 ~]$ hostname
wahab-01
[USER_ID@wahab-01 ~]$ nproc --all
80
[USER_ID@wahab-01 ~]$ free
               total        used        free      shared  buff/cache   available
Mem:       196623292    29286984    63116716     3141380   108851824   167336308
Swap:              0           0           0
Here is the explanation about this commands:
whoami: This command displays the username of the current user executing the command.
hostname: The command returns the network name of the machine. This name is used to identify the machine on a network.
nproc --all:This command displays the number of processing units (CPU cores) available to the system.
free: The command provides information about the total amount of free and used physical memory (RAM) and swap memory in the system, along with the buffer and cache used by the kernel.
Disconnecting
To exit and disconnect from Wahab (the remote machine),
simply type exit and press Enter.
Do You Know?
Despite the lack of awareness among typical computer users, Linux is a very popular operating system in the HPC world. In fact, by June 2018, all TOP500 supercomputers are using Linux as its operating system.
The “SSH + UNIX shell” access method described in this lesson is not unique to HPC systems. In fact, with the right software (SSH server), any network-connected computers (whether using Linux, Mac OS, and even Windows) can be remotely accessed using SSH.
The majority of servers all around the world that provide us services (think of Google, Facebook, Amazon, …) run Linux or UNIX of some sort under the hood. Many services in the cloud today also run Linux. Linux/UNIX skills are highly marketable in today’s heavily digitized world.
Key Points
An HPC cluster is remotely accessed using secure shell